Friday, November 9, 2012

Butternut Squash - Try something new!

Ever walk into the grocery store during the holidays and see a display full of these, along with many other gourds and squash? Ever wonder what the heck people do with them other than decorate or have them falling out of a huge cornucopia? Well come to find out many of these odd shaped vegetables/fruits are absolutely delicious!
This particular beauty is a butternut squash and it is very popular during the winter months. It has a sweet yet nutty flavor, similar to a pumpkin.  Butternut squash is actually a fruit and it can be prepared in multiple ways from soup, to purees, to roasting. The other night I made a Butternut squash and vanilla bean risotto. Yes it may sound like an odd combination, but fear not this creamy risotto is well worth a try.  Anyways cooking isn't about playing it safe. It's about picking up that odd shaped fruit/vegetable at the grocery store that you have no idea what do with, taking it home and trying something new! I am a working mother and we are all about routine around here so if it seems that I am getting excited about a piece of squash it's because I am! The kitchen is the one place where routine should be thrown out the window! Try something new people, and here it is!!!

Butternut squash and vanilla bean risotto

6 cups low sodium chicken broth
1 small yellow onion diced
1 1/2 cups arborio rice
1/2 butternut squash peeled and diced
1 vanilla bean
1 clove garlic minced
4 tbs cold butter (unsalted)
salt and pepper

First peel and dice your butternut squash. You want to cut off the ends then slice it down the middle horizontally. Spoon out the center, just like a pumpkin. Once you have cleaned out the center slice the squash in long strips then slice in half again. then dice in small cubes like so. 


 Once you have your butternut squash diced, dice your onion and garlic as well and have set aside. You will need all of your ingredients out and ready to go, because once you start cooking risotto you won't be able to leave it. People say risotto is hard to cook and that it takes a long time but honestly it's pretty easy, you just need to watch it and give it some love.
Next get your chicken broth ready. Pour your 6 cups of broth into a pot and keep on medium low heat. You will be adding the broth to your risotto ladle by ladle. Keeping your broth warm will help quicken the cooking process. Next heat your saute pan for the risotto. Medium Hi heat and add a couple Tbs olive oil and 1 Tbs butter, toss in your onion, garlic, and a pinch of salt and saute until fragrant and translucent. Then add in your butternut squash and arborio rice. You want to saute your rice for a few minutes before you add in any liquid. After about 5 minutes add in your warm chicken broth only 2 ladles full. If the broth starts boiling rapidly when it hits the pan turn down your heat. Again this is a slow cooking process, you want your liquid to be at a low simmer. After you have added the first of your liquid, split your vanilla bean down the center and scrape out the beans. Place the beans and the pod into the risotto pot. Continue to stir your risotto with a wooden spoon, once the first of your liquid has evaporated add in another ladle and continue to stir. Repeat this process until all of your liquid is gone. Here it is at a glance..


This whole process will take about 20-25 minutes. You will start to see your rice release it's starch and the risotto will get creamy. Just continue to taste it as you go. Arborio rice is actually a pasta so like any pasta you will be able to taste if it is done or not. You want the rice to be smooth and creamy it should not have a bite to it. After your broth is all used up and your risotto is thick, finish it off with about 3 Tbs cold butter cubes. Throw in the butter and stir quickly. Season to taste with salt and pepper. You will want to serve immediately.
I paired this risotto with a coffee rubbed steak. It's a perfect compliment to this sweet yet savory dish.

Coffee Rub:
1 Tbs coffee
1 Tbs kosher salt
1 Tbs brown sugar
1 Tbs fresh rosemary

I hope you will take a chance on something new this holiday season! Don't be afraid, just go for it! If it doesn't work out you can always try, try, try, again!!!

Happy Eatings!


Friday, September 14, 2012

Last days of summer ~ Lemon Bars

I had these lemon bars as a feature dessert on our menu during the summertime. My favorite thing to cook with is lemon, I love how fresh it tastes. The bright yellow color, the tartness of the juice, and splash of citrus flavor you get from the zest can immediately add sunshine to anything your cooking. These Lemon bars are perfect for parties and make a great finger food dessert. I know I will be adding them to my list of sweets to bring to my sons school parties.
  Making dessert bars is a pretty easy method and once you get started you can play around with different flavors and ingredients.

To start you need to make the bottom layer:

Dough:
1 stick unsalted butter - room temp
1/2 cup sugar
2 cups flour
pinch of kosher salt

Cream together your butter and sugar
*the creaming process is very important when baking anything, but mostly in cakes. (Your butter has to be at room temp and you can not speed up this process by microwaving!)


Once you have creamed your butter and sugar slowly add your flour and pinch of salt until your dough comes together. Turn out your dough on a floured work surface and bring it together with your hands. This should be a quick process.
Line your baking pan with parchment paper or foil and spray lightly with pan spray. You want your parchment paper to over lap the sides so you can easily lift out your bars and cut them. Also use a pan with larger sides, you will be pouring a curd into the dish and you don't want it to run. (I made this mistake)
Take your dough and press it evenly throughout the bottom of the whole pan.

Chill your dough for about 10 min then bake at 350 for about 12 min or until just golden brown.
While your dough is baking get out a mixing bowl and make your lemon curd.

6 eggs
3 egg yolks
3 cups sugar
1 cup fresh lemon juice
1 Tbs lemon zest
1/2 cup flour
1/2 cup heavy cream

Mix all ingredients together in a large bowl. When your bottom layer has cooled pour your curd over the cookie and bake at 350 for 30 minutes. It is finished when the curd is set so it should not wiggle when you move your pan.
Let cool and top with powdered sugar.

I served mine with a blueberry sauce but any fresh fruit or just by themselves is perfect for me!


Enjoy and Happy Eatings,
Krystal

Wednesday, September 5, 2012

Cobblers, Tarts, and Pies..oh my! Part 2 - Plum Cobbler

So last post I made a beautiful French Nectarine Tart with a buttery and flaky crust. I hope you all got to enjoy that for yourselves at home. Now we have moved on to part 2 of Cobblers, Tarts, and Pies..oh my! The always unforgettable cobbler. In this case a plum cobbler or crisp I should say because I always make my cobblers with a crispy yet still moist and chewy topping! I absolutely love this dessert! This dessert is perfect for any occasion from early fall all the way through winter and you can use just about any fall and winter fruit you want! Today it's plums.
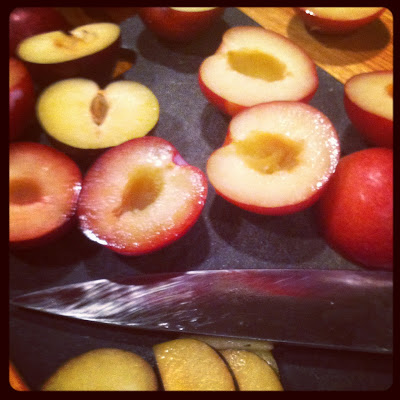
        I found the plums today nestled in with the nectarines, you almost couldn't tell a difference. These plums aren't the dark purple colored plums from summer they were the red and yellow colored plums and they were perfectly ripe, not to sweet with a tart bite. It was late afternoon here and a humid yet rainy day so it was almost dark out. When I got started on making my cobbler I had just cleaned the kitchen. I had a load of laundry going and I decided to light a candle to help make my house smell better because my mom was coming over to stay with us for the night, so obviously I wanted the appearance of a an up-kept home! In the middle of slicing and pitting my plums it starts to thunder and then comes the rain. I am in my kitchen with the sound of the rain, my kids laughter upstairs, and the smell of this cheap cinnamon candle and that was it....Summer had officially ended for me at that moment, fall is here and the holidays are creeping up on me. I kept getting flashbacks of years past with cozy fires, football on the T.V. and being surrounded by friends and family. Next thing you know I'm getting choked up, yes I know it's totally ridiculous to stand in your kitchen and tear up while making plum cobbler, but what it really did was put me right back in my place. The place of "oh yeah this is why I do this". This is why you quit your job to go after your dream, this is why you put your family under a huge financial strain, and this is why you are 31 and working in a kitchen for an hourly wage and mopping floors at midnight. I did and am currently doing all these things for this exact reason, this exact feeling. Every good heart warming and even some not so heart warming moments have always included food. Sitting around a dinner table, standing around an island in a kitchen, or just being out and about eating (and sometimes drinking), it's all about the moments in life. Food can trigger those moments or make those moments and that's why I have a passion for it. I want be a part of your moments and help make them great. I want to make you get choked up in your kitchen when you are cooking something that has a meaning. Food brings us all together in some way or another and I hope in a small way I can bring people together to.
DANG is this a food blog or my personal therapy session!!! Lets get back to the cobbler people!
   First of all you want to start by pitting your plums and slicing them. Just cut them in half and use a spoon or a small paring knife to cut out the pits then slice them thin.

Place all your sliced plums directly into your baking dish.
To your plums add:

1/2 cup sugar
1/4 cup AP Flour
1/4 tsp cinnamon
3 Tbs champagne (optional)
1 Tbs orange juice

*note if you do not have champagne around your house like me because I love mimosas on Sunday you can just add 2 Tbs orange juice all together

For the crumb topping:

1/3 cup sugar
1/4 cup light brown sugar
1 cup AP Flour
zest of 1 orange
1 stick cold butter cut into cubes
1/2 tsp salt (kosher salt)
1/2 cup oats

* note you can substitute pecans or walnuts for the oats or add both

In the bowl of a standing mixer add your flour, sugars, salt, orange zest, and oats. Mix until combined then add your cubed butter. Keeping your mixer on a low speed this process should take about 2 full minutes. You want to mix the topping until it looks moist and can form a ball in your hand when you squeeze it. Here is a look at the process..


cubed butter                                                                     about 1 minute of mixing


2 minutes                                                                     Holds together


                               Crumble your topping over the plums..


Bake at 350 degrees for 45 minutes or until the topping is golden brown and the sides are bubbly! I serve mine warm and with vanilla bean ice cream! 

It may not look fancy, but it's a cobbler you will cry over.....

Happy Eatings everyone and I hope this will bring you some sort of special moment!
   
Krystal

Tuesday, August 28, 2012

Cobblers, Pies, and Tarts..oh my!

It's a beautiful Indian summer here in the mid-west and that makes for some sweet, juicy, and ripe fruits. Since I am now making pastries for a living I figured I might as well start to blog about it! I never really do a lot of baking at my house, but when I do it's always some sort of cobbler or tart. There is nothing better than a warm bubbly cobbler with a crunchy oatmeal topping or crisp fruit tart with a flaky crust.
The other day we were invited over to my dads for dinner with the family. My dad always mans the grill and one thing you always know when your headed to dads for dinner is there is going to be a grilled meat, a fresh vegetable from his garden, and of course cold Bud Lights! My dad always says not to bring anything when we come over but I always like to do my part, so I headed to the local market and when I walked into the produce area all I could smell were these beautiful ripe Nectarines! They were perfect and I decided I would make a quick French Nectarine Tart! I know it sounds fancy but it is so easy to make and so delicious it will be on your Indian Summer menu's every year!
The most work you will do making this dessert is making the tart dough. The dough is the same dough I used when I made my galette in a previous blog with one added ingredient. Since I was making a sweet not savory dish I added 1 Tbs sugar.
Here is what you need for the dough:

1 1/4 Cups Ap flour
1 Tbs Granulated sugaar
8 Tbs Cold butter cut into cubes
1 egg beaten
pinch of salt

In a food processor pulse your flour, sugar, salt, and butter until blended. On low speed add in your beaten egg and mix only until your dough almost comes together. You do not want the dough to form a big ball in the food processor and it get over mixed. Turn your dough out onto a cold work surface and bring it together with your hands. This is a very quick process, bring the dough together just enough for it to form a disc shape, then wrap in plastic wrap and refrigerate for up to 1 hour.
While you are waiting for your dough to chill rinse, pit, and slice your nectarines. You want nice even slices about 1/4 of an inch thick if that.
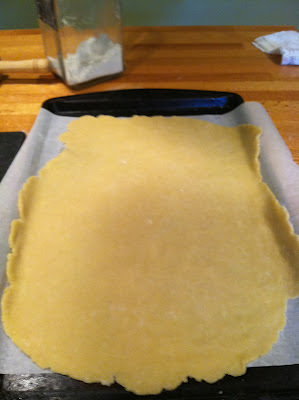
When your dough has chilled for an hour pull it out of the fridge and roll it out into a large rectangular shape. About the shape of of your baking sheet.
Like so..

Make sure you have your flour near by to flour your work space with and your rolling pin. Once you have your dough rolled out place it atop a lined baking sheet. Again you want to work as quickly as possible with this dough. The point is to keep the butter in the dough as cold as possible so when it bakes in the oven the cold butter will disperse all throughout the dough giving it that flaky crisp texture.


After your dough is on the baking sheet line it with your nectarines....


Don't overlap your fruit. You want the look of the nice uniform lines, it just makes it look so much more fancy! Top the nectarines with 6 Tbs of cold butter cut into small cubes. Place the butter cubes all over the tart, then grab a handful of granulated sugar and sprinkle a nice layer over the entire tart.
To finish I also add some brown sugar as well.


This is what it should look like right before you place it in the oven. The butter and sugar should be distributed evenly over the entire top of the tart.
Have your oven preheated to 350 degrees.
Place the tart in the center of the rack and bake for about 25 minutes. You want the fruit to cook down and the sugars to caramelize. Don't worry if some of your edges start to look to dark, it is because of the sugars. Pull out of the oven let cool for 5 minutes and cut into squares. You can serve warm or at room temp!

 A beautiful fancy nectarine tart. Perfect for Indian Summer nights! The edges are crisp and flaky while the dough still has a tender bite to it! This dessert can be thrown together in an hour and baked before hand if needed!

Enjoy the last days of summer and Happy Eatings!!!

Friday, August 10, 2012

Pork Cabbage Rolls - aka My Demise!


So as you all know I had a good .5 seconds of fame on a nationally televised show called Masterchef! I went in and earned my notorious Masterchef apron from the 3 judges Gordon Ramsay, Graham Elliot, and Joe Bastianich. That apron put me in the top 36 and floated me into round 2 which was the ground beef challenge. When I found out that I had to cook with ground beef I wasn't exactly excited about it. I don't cook with ground beef that often in my house and when I do I usually always blend it with other meats like ground pork, especially when I'm making meatballs or bolognese sauce. The official rules of the challenge were pretty simple the ground beef is the star so make it good and make your dish stand out. My first initial thought was to make my grandma's meatball recipe. Why I steered away from this idea I'm not sure, those meatballs are solid! I guess I thought I should make something different, everyone else would be making either meatballs, bolognese sauce, or a hamburger. I wanted to turn this ground beef into a dish that was light with a lot of flavor. Ground beef to me is usually greasy and heavy on your belly, I thought this light yet very flavorful cabbage roll would do the trick. I wanted those judges to keep coming back for more! This dish has a lot of Asian flavors and a wonderful warm mushroom broth to go along with it. I make this at home quite often, it's great for light dish in the summer and a dish that will warm you up in the winter! Here is how you make them and you can judge for yourself if I should have been sent home!

For your roll:
1 lbs ground pork - (for the challenge I used a 2-1 ratio of ground beef and ground pork)
1 cup cooked white rice - (you can also use brown rice for a healthier alternative it works just as well)
2 Tbs soy sauce
1 Tbs sesame oil
3 green onion minced
1/2 of a red chili - small diced (save the other half for your broth)
1 small piece fresh ginger grated (I use about a 1/2 inch piece and I zest it directly into the mixture)
1 clove garlic ( I also zest this into the mixture)
2 Tbs chopped cilantro
pinch of salt ( you don't want to use to much the soy sauce already adds that salty flavor)
black pepper
1 head green cabbage

For you Broth:
2 Qt - chicken broth low sodium
1 lbs shitake mushrooms
2 green onions
1- 1 inch piece fresh ginger
1/2 red chili
Juice of 1/2 a lime
1 Tbs soy sauce
1Tbs sesame oil

Get all your ingredients in a medium stock pot for your broth and bring to a low simmer. Don't worry about the cuts of your vegetables we are just going for flavor here. You want to keep your broth simmering the whole time as you prepare your rolls. Do not boil your broth, all your liquid will just evaporate and you don't want that.
Now for the filling:

Get you pork in a bowl and start to add all your other ingredients,
I usually add my rice last. Dice your red chili, green onions, and chop your cilantro. Then using a zester, zest your garlic and ginger over the bowl. This will let those flavors just melt right into the meat. Add your liquids and then let your pork sit in the fridge while you are blanching your cabbage so it will soak up all those flavors.
Now you are going to want to blanch your cabbage leaves so you can roll them and get them nice and tender. Blanching is basically placing your vegetable in boiling water for a small amount of time and then shocking them in an ice bath immediately after to stop the cooking process. This will let that cabbage keep its bright beautiful green color. So get a pot of boiling water going, and a bowl of ice water ready on the counter next to your pot. Keeping your cabbage intact peel each leaf off one by one. You will need about 8-9 leaves. Once your leaves are all peeled place a few at a time in the boiling water. Let them boil for about 1 minute and thats it then take them and place directly into the ice water.


When you have finished blanching all your cabbage leaves pat them dry with a paper towel. Pull your pork mixture out of the fridge and add your cooked rice. mix together with a fork until its all blended. Now it's time to assemble your rolls. Grab a leaf of cabbage and place a good 2 spoon fulls of pork inside.

  Then carefully roll your cabbage over the pork, tuck in the sides as you go. Just like your rolling a burrito. Place seam side down and continue until all your pork is gone.

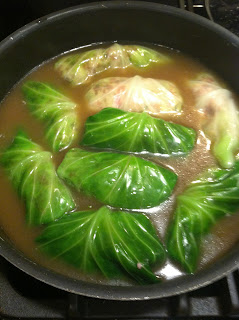
  Now all this time you should have had your broth on a nice simmer. Always continue to taste your broth throughout this process to see if it needs anything, sometimes you might need to add a little more liquid, if so I usually add a little water to it. When the cabbage rolls are ready place them in a shallow pot seam side down, then strain your broth directly over the rolls. Only saving the mushrooms from the broth, you can disregard everything else.


Bring to a light simmer and cover for about 20-25 minutes. Remove the lid after 25 minutes and they should be done! If you touch the roll with your finger and the meat inside feels nice and firm then it's ready! Garnish your rolls with the shitake mushrooms and fresh cilantro!
Just so you know the judges never tasted this, I would have still been there if they had!! It's a great dish and my kids love it! I definitely got a YES from my 5 year old when he tasted it and that is what really counts in my book!!
Enjoy and Happy Eatings!!!!

Sunday, July 22, 2012

Fresh Zucchini Galette

Now that summer is in full swing as well as all the local farmers markets I have an abundance of fresh zucchini. Obviously I will be making homemade zucchini bread but a girl can only make so many loaves! I like to try different things when cooking dinner for my family so instead of throwing some zucchini on the grill or roasting it I decided to make a galette! A Galette is basically a term used in French cuisine for a free formed crusty cake or pie. It can be sweet or savory. I went with savory in this case and served it as a side item to my roasted pork tenderloin. There is just something about making a dish from scratch that I just crave. Starting with making the dough, letting it rest, and then rolling it out and filling it with fresh vegetables, herbs, and grated Gruyere. It sounds like it's a lot of work but actually it only takes about 35 minutes for this dish to come together and it's totally worth it. The flaky crust combined with warm savory zucchini and herbs all topped with melted cheese well you just can't go wrong with that! It was a hit around this house and my kids loved it! They got a full helping of vegetables without even realizing it!
The great thing about a galette is that you can fill the pastry with any flavor you like, so if you don't like zucchini then you can use another vegetable or you can go sweet and fill it with fresh peach's and strawberries or apples and onions! Make it your own that is the whole point of cooking!

The key to the galette is the dough, so we will start with that. It's actually your most basic dough in baking all you need is flour, salt, and cold butter! Here's how you make it:

1 1/4 cups AP Flour
1 stick cold butter cubed
1 egg beaten
pinch of salt
ice water

Place your flour in a food processor along with a pinch of salt. Pulse the food processor a couple times to combine. Add your cold butter a few cubes at a time. (Make sure you use cold butter) continue to pulse while you add all your butter. Once your butter is added the dough should start to come together. You want the dough to be flaky almost like a corn meal consistency. Just continue to pulse the dough until it just starts to form. Take off the lid and grab some with your hand and if the dough comes together in your hand like a snow ball then it's ready. If it seems to dry that's when you can add about a tablespoon of your ice water. Once your dough comes together take it out of your food processor and on to your counter top. Knead the dough just enough for it to all come together and form a ball. Flatten the dough into a disc like shape and cover in plastic wrap. Refrigerate for 30 min.


While your dough is resting get all of your other ingredients ready. Slice your zucchini in long strips. If you have a large zucchini then you can cut in half then slice each half. Place your sliced zucchini in a bowl. I also added fresh kumato tomato's for some acidity and I just love roasted tomato's. I used 2 tomato's and sliced them also. Add your tomato's to the bowl with the zucchini and season them with salt and pepper. Add in about a tablespoon of fresh thyme and about 2 tablespoons of Extra Virgin Olive Oil. Next grate your Gruyere cheese. You can find Gruyere in the specialty cheese section of your local grocery store. If you can't find it you can always substitute with Swiss cheese. Toss half of the grated cheese in with the vegetable mixture. Once 30 minutes is up grab your dough and roll it out.  


Flour your work space so the dough doesn't stick. You will want to work quickly because you don't want the butter to get to warm in the dough. The best way to roll out dough is to place your rolling pin in the center of the dough and roll out towards the ends then turn the dough counterclockwise and repeat with the rolling pin. Continuing to turn the dough in between each roll. This will give you a nice large circle. You want your dough to be about 1/4 inch thick. Once you have rolled out your dough start to layer your vegetables in the center leaving a 1 inch rim of dough on the edges. When all your vegetables are layered fold your edge up and around the filling, like so.


Brush your edges with the beaten egg and top off the vegetables with the rest of your grated Gruyere cheese.
That's it bake at 350 degrees for about 20-25 minutes until your crust is golden brown and the center is nice and bubbly!


Your summer zucchini galette! YUM!

Remember the filling is up to you so have fun and get creative in your own kitchen! Thats the whole point of cookin!!!!

Happy Eatings!

Sunday, May 27, 2012

Summer Shrimp Ceviche

One bite of this and you will be immediately transported to a small cantina with an umbrella in your drink and a front row seat to the clear blue horizon of the baja in Mexico! Trust me if you can put summertime into one bite this fresh shrimp ceviche is it! Ceviche is basically a seafood salsa and the greatest thing about it is, there is no cooking involved. All you will need to do is chop, mix, and wait. You can make ceviche out of many different kinds of fresh fish most commonly it's made out of shrimp, scallops, swordfish, or halibut. What makes this salsa so unique and fresh is the fact that the fish will cook while it is submerged in the lime juice, due to the acid from the juice. If you want to bring something different and refreshing to your memorial day grill out look no further. This will quickly become your most requested appetizer for the summer!

Heres what you need to do:


Summer Shrimp Ceviche:                                       


1 lbs - fresh raw shrimp
1 - bunch cilantro
1 - jalapeno
1 - ripe mango
1 - roma tomato
1 - ripe avocado
1 - shallot
1 cup - fresh lime juice (about 9-10 limes)
1Tbs - sugar
1/2 Tbs - kosher salt


First peel and rinse your shrimp. Dice your shrimp into bite size pieces and place in a bowl. Next peel and dice your mango. Then dice up your shallot, tomato, and jalapeno and add to the bowl. Remember the heat is in the seeds of the jalapeno so the more seeds the more heat! Coarsely chop your cilantro you want about a 1/2cup. Juice your limes, it's important you use FRESH lime juice. Pour the juice over all your ingredients then add your sugar and salt. Make sure the shrimp is fully submerged in the juice add more if needed. Mix your ingredients cover and refrigerate for about 4 hours. Check on it after 2 hours and give it another stir. You will see your shrimp starting to cook. When its ready your shrimp will be bright white and pink. You do not want your shrimp to have a translucent color. If it does it is not fully cooked so give it some more time!
I always add my avocado right before service this will keep the color nice and bright green. Serve in a bowl along side some hint of lime tortilla chips!
Summer is here, get excited about it and make some Ceviche!!!

This shrimp ceviche goes great with a couple Corona's and lime as well!!!
Happy Eatings Everyone,
Krystal

Tuesday, May 22, 2012

Make your own Ricotta..? Yes Please!!


Who doesn't love cheese? It's the best snack in the world!!  It brings back so many memories of me as a kid coming home from school and cutting up a block of cheese, putting it on top of a triscuit with some spicy mustard or one of my dad's famous canned banana peppers and chowing down! Though blocked cheese is a constant in my dairy drawer I have recently ventured out and started making my own. For a first timer I began with a pretty simple recipe making the soft and creamy cows milk cheese Ricotta! There are multiple recipe's out there for Ricotta some quicker than others. I chose an easy recipe but with a longer wait time. My motto was "all good things come to those who wait" and boy it did!
The Ricotta came out light and fluffy with a mild flavor. I spread mine over grilled ciabatta bread and topped with grilled zucchini and basil oil. It was a perfect compliment to our Sunday dinner of bacon wrapped filet's, crisp white wine and the warm spring evening air as we dined alfresco! 

Heres how I made my own Ricotta, it's a simple recipe but does have a days wait time so take that into consideration when you begin. 
A few things you will need for this recipe that you might not have around the house:
  • Cheesecloth - you can find this at a Bed Bath and Beyond and some local grocery stores
  • Heavy bottomed sauce pan - I used my dutch oven
  • Candy thermometer or digital thermometer  
Recipe:

4 cups - whole milk
1 1/4 cups - heavy cream
1 tsp - salt
1/4 cup - lemon juice (fresh squeezed)

Place all ingredients into a heavy bottomed sauce pot or dutch oven. Bring your ingredients up to 200 degrees. Turn off your heat and cover. Place in an area where the temp stays the same. I put mine in my oven. Let sit for 6 hours. After the 6 hours remove lid you will see your curds and whey.
Place your cheesecloth over a bowl and pour your mixture into the cloth. lift up your cheesecloth and let the liquid strain through. You are going to let your cheese strain over night so find a place where you can hang your cloth. I tied mine around the faucet of my kitchen sink so it could strain directly down the drain.


      After you let your cheese strain over night open up your cheese cloth and you will have homemade Ricotta! Wrap in plastic film or place in an air tight container and refrigerate. From here you can do whatever you would like with your cheese. If you want to make into a fresh spring bruschetta like I did it's really simple.
First slice up some fresh bread (I used ciabatta) brush with good olive oil and a little salt. Grill on both sides of the bread until warm and crispy. While you are grilling the bread you will also want to grill your zucchini. Slice your zucchini length wise into about 1/4 in thick pieces. brush with good olive oil and salt and pepper each side. Place on grill for about 3 minutes on each side just enough to get some nice grill marks. Take your bread and zucchini off the grill. Spread your Ricotta over the bread and place the zucchini on top. Drizzle with basil oil.

Basil Oil:

1 cup - fresh basil leaves
1/2 cup - olive oil
1/4 tsp salt

Blanch your basil leaves in boiling water just for about 1 minute. Place in a bowl of ice water immediately after. This will keep the nice bright green color. Drain your basil leaves and put in a blender with olive oil and salt. Blend until smooth.


                     Now I know this doesn't look as put together as some of my other foods but believe me the flavor makes up for it! A perfect side dish or appetizer for any grill out!!

Happy Eatings!!!!

Tips:
Add fresh chopped herbs to your ricotta to add flavor or you could mix with some goat cheese and stuff in pasta shells!


Saturday, May 12, 2012

Mothers Day...BRUNCH

Happy Mothers Day! To all the wonderful hard working mothers out there. Today is the day to sit back relax and eat anything your heart desires! This mama's heart desires smoked salmon and a poached egg. It's my own play on Eggs Benedict. First I start with making homemade vegetable cream cheese that I put atop a toasted everything bagel and then the layers begin with sliced ripe tomato's, a couple leaves of fresh spinach, beautiful smoked salmon, and to top it off a perfectly cooked poached egg. If I could eat one thing for the rest of my life this would be at the top of my list. There is just something about a poached egg, the creamy yolk that oozes out with the prick of your fork and becomes a complimentary sauce to the entire dish. Of course this will be accompanied by a mimosa or two....   Here's to you mom's and here's how to make this dish!

Vegetable cream cheese:                         

1 shallot - diced
2 carrots - diced
1 stalk celery - diced
2 radishes - diced
1/2 red bell pepper - diced
8oz cream cheese at room temp
pinch of salt

With an electric mixer fitted with a paddle attachment add all your ingredients and blend until your cream cheese is smooth and everything is incorporated.

Thats it. I like to store mine in the refrigerator for a few hours so the flavors come together.


 Now for the somewhat tricky part only if you have never poached an egg before. Here is how:

Use a large shallow pot or sauce pot and fill half way up with water. Put your water on med high heat, you DO NOT want to bring your water to a boil or even to a simmer. I poached my egg at about 150 degrees. Rule of thumb is you should be able to put your finger down in the water and pull it out without burning it. You will see small bubbles form at the bottom of the pot and steam will be coming off the top. I also add about 1 Tbs of white vinegar, this helps stabilize your egg. Next rule, when the water is ready do not just crack your egg into the pot...you will have to start over! Crack your egg into a small bowl then submerge your bowl with the egg down into the water. Let the water come up into the side of the bowl then slowly pull the bowl out leaving the egg down in the water. I let mine poach for 5 minutes exactly. Use a slotted spoon to retrieve your egg and place on a towel. Let cool slightly and then it's ready to plate!

Here is the finished product with that beautiful silky sauce of the yolk that is so bright and creamy!
I topped mine with fresh dill and finished off with a little chive oil!
Happy Mothers Day! From one mom to the next it's an incredibly hard and wonderfully rewarding job a job that will never end nor will we want it to!
Have a great day and remember to eat what your heart desires...I know I will!!

Happy Eatings Mommy's!

Tuesday, May 8, 2012

Sunday Dinner - Perfect Herb Roast Chicken

Sunday dinner is not only made popular by Italians or the kids from the Jersey Shore, but is also something we cherish here at my house. It should be a family affair for all households. Throughout the busy week, you may not always have time to sit down as a family and have a good wholesome meal. Although I always try to make it a point to have a home cooked meal for my kids, we do not always have all four of us at the dinner table. My husband works most evenings but Sundays are always his day off. I look forward to Sunday every week and I always have something in mind that I want to cook for the family. It doesn't have to be anything fancy, the only thing that matters is that the food tastes good and that my whole family is around the dinner table!
Here is a great dish that is light on the wallet, delectable on the pallet, and will leave you with some nice leftovers for the week.


Perfect Herb Roast Chicken:                                                                                                                 
                                                                                
1 - 4-5lbs whole chicken
1 - bunch parsley
1 - bunch thyme
2 - sprigs tarragon
1 - lemon
1 - whole round garlic halved skin on
1 - stick unsalted butter at room temp
Salt and Pepper

Preheat oven to 400

First I make an herb butter. You can use whatever herbs you have around the house. Once your butter reaches room temp, place it in a bowl. Finely chop about a 1Tbs of parsley, thyme, and tarragon, add to butter. Zest your lemon in the butter as well and mix so all ingredients are incorporated. Rinse your chicken and remove any insides. Place in a roasting pan and pat dry with paper towels. Salt and pepper inside the carcass. At the opening of the bird on the breast side, run your index finger underneath the skin but above the breast. Once you have stretched the skin enough grab your butter and place between the skin and breast. Try to push the butter as far back on the breast meat as possible without tearing the skin. Sometimes I push the butter back and then I message the skin on top to get the butter all over. Use the rest of the butter and rub all over the outside of the bird. Then salt and pepper the entire bird. Slice your lemon and garlic in half and stuff inside the bird along with the rest of your herbs. Place the bird in the oven uncovered and cook for 1hour and 30min or until your thermometer reads 165degrees. Baste your bird throughout the cooking process with the pan drippings. If the bottom of your pan seems a little dry add about 1cup of water. Once your bird is cooked remove from the oven, cover, and let rest for an additional 10 minutes. The resting period is very important. This allows all those succulent juices to re-distribute throughout the bird so when its time for you to cut into it the bird will be moist and juicy! If you do not allow to rest and just cut right into it all those juices will just pour out onto your cutting bored and be wasted. The combination of the herb butter, garlic, and fresh lemon is a perfect pairing with poultry. I also use this method with my turkey for Thanksgiving though I do use different herbs. This chicken will come out perfect and moist every time!
I served mine over a sweet corn and asparagus succotash and topped with basil oil! Pair with a crisp glass of Pinot Grigio or Sauvignon Blanc and that is one beautiful Sunday dinner!!!
Happy Eatings Everyone,
Krystal