It's a beautiful Indian summer here in the mid-west and that makes for some sweet, juicy, and ripe fruits. Since I am now making pastries for a living I figured I might as well start to blog about it! I never really do a lot of baking at my house, but when I do it's always some sort of cobbler or tart. There is nothing better than a warm bubbly cobbler with a crunchy oatmeal topping or crisp fruit tart with a flaky crust.
The other day we were invited over to my dads for dinner with the family. My dad always mans the grill and one thing you always know when your headed to dads for dinner is there is going to be a grilled meat, a fresh vegetable from his garden, and of course cold Bud Lights! My dad always says not to bring anything when we come over but I always like to do my part, so I headed to the local market and when I walked into the produce area all I could smell were these beautiful ripe Nectarines! They were perfect and I decided I would make a quick French Nectarine Tart! I know it sounds fancy but it is so easy to make and so delicious it will be on your Indian Summer menu's every year!
The most work you will do making this dessert is making the tart dough. The dough is the same dough I used when I made my galette in a previous blog with one added ingredient. Since I was making a sweet not savory dish I added 1 Tbs sugar.
Here is what you need for the dough:
1 1/4 Cups Ap flour
1 Tbs Granulated sugaar
8 Tbs Cold butter cut into cubes
1 egg beaten
pinch of salt
In a food processor pulse your flour, sugar, salt, and butter until blended. On low speed add in your beaten egg and mix only until your dough almost comes together. You do not want the dough to form a big ball in the food processor and it get over mixed. Turn your dough out onto a cold work surface and bring it together with your hands. This is a very quick process, bring the dough together just enough for it to form a disc shape, then wrap in plastic wrap and refrigerate for up to 1 hour.
While you are waiting for your dough to chill rinse, pit, and slice your nectarines. You want nice even slices about 1/4 of an inch thick if that.
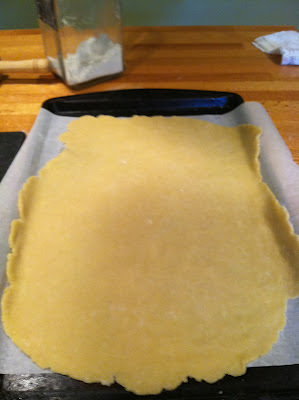
When your dough has chilled for an hour pull it out of the fridge and roll it out into a large rectangular shape. About the shape of of your baking sheet.
Like so..
Make sure you have your flour near by to flour your work space with and your rolling pin. Once you have your dough rolled out place it atop a lined baking sheet. Again you want to work as quickly as possible with this dough. The point is to keep the butter in the dough as cold as possible so when it bakes in the oven the cold butter will disperse all throughout the dough giving it that flaky crisp texture.
After your dough is on the baking sheet line it with your nectarines....
Don't overlap your fruit. You want the look of the nice uniform lines, it just makes it look so much more fancy! Top the nectarines with 6 Tbs of cold butter cut into small cubes. Place the butter cubes all over the tart, then grab a handful of granulated sugar and sprinkle a nice layer over the entire tart.
To finish I also add some brown sugar as well.
This is what it should look like right before you place it in the oven. The butter and sugar should be distributed evenly over the entire top of the tart.
Have your oven preheated to 350 degrees.
Place the tart in the center of the rack and bake for about 25 minutes. You want the fruit to cook down and the sugars to caramelize. Don't worry if some of your edges start to look to dark, it is because of the sugars. Pull out of the oven let cool for 5 minutes and cut into squares. You can serve warm or at room temp!
A beautiful fancy nectarine tart. Perfect for Indian Summer nights! The edges are crisp and flaky while the dough still has a tender bite to it! This dessert can be thrown together in an hour and baked before hand if needed!
Enjoy the last days of summer and Happy Eatings!!!
Tuesday, August 28, 2012
Friday, August 10, 2012
Pork Cabbage Rolls - aka My Demise!
So as you all know I had a good .5 seconds of fame on a nationally televised show called Masterchef! I went in and earned my notorious Masterchef apron from the 3 judges Gordon Ramsay, Graham Elliot, and Joe Bastianich. That apron put me in the top 36 and floated me into round 2 which was the ground beef challenge. When I found out that I had to cook with ground beef I wasn't exactly excited about it. I don't cook with ground beef that often in my house and when I do I usually always blend it with other meats like ground pork, especially when I'm making meatballs or bolognese sauce. The official rules of the challenge were pretty simple the ground beef is the star so make it good and make your dish stand out. My first initial thought was to make my grandma's meatball recipe. Why I steered away from this idea I'm not sure, those meatballs are solid! I guess I thought I should make something different, everyone else would be making either meatballs, bolognese sauce, or a hamburger. I wanted to turn this ground beef into a dish that was light with a lot of flavor. Ground beef to me is usually greasy and heavy on your belly, I thought this light yet very flavorful cabbage roll would do the trick. I wanted those judges to keep coming back for more! This dish has a lot of Asian flavors and a wonderful warm mushroom broth to go along with it. I make this at home quite often, it's great for light dish in the summer and a dish that will warm you up in the winter! Here is how you make them and you can judge for yourself if I should have been sent home!
For your roll:
1 lbs ground pork - (for the challenge I used a 2-1 ratio of ground beef and ground pork)
1 cup cooked white rice - (you can also use brown rice for a healthier alternative it works just as well)
2 Tbs soy sauce
1 Tbs sesame oil
3 green onion minced
1/2 of a red chili - small diced (save the other half for your broth)
1 small piece fresh ginger grated (I use about a 1/2 inch piece and I zest it directly into the mixture)
1 clove garlic ( I also zest this into the mixture)
2 Tbs chopped cilantro
pinch of salt ( you don't want to use to much the soy sauce already adds that salty flavor)
black pepper
1 head green cabbage
For you Broth:
2 Qt - chicken broth low sodium
1 lbs shitake mushrooms
2 green onions
1- 1 inch piece fresh ginger
1/2 red chili
Juice of 1/2 a lime
1 Tbs soy sauce
1Tbs sesame oil
Get all your ingredients in a medium stock pot for your broth and bring to a low simmer. Don't worry about the cuts of your vegetables we are just going for flavor here. You want to keep your broth simmering the whole time as you prepare your rolls. Do not boil your broth, all your liquid will just evaporate and you don't want that.
Now for the filling:
Get you pork in a bowl and start to add all your other ingredients,
I usually add my rice last. Dice your red chili, green onions, and chop your cilantro. Then using a zester, zest your garlic and ginger over the bowl. This will let those flavors just melt right into the meat. Add your liquids and then let your pork sit in the fridge while you are blanching your cabbage so it will soak up all those flavors.
Now you are going to want to blanch your cabbage leaves so you can roll them and get them nice and tender. Blanching is basically placing your vegetable in boiling water for a small amount of time and then shocking them in an ice bath immediately after to stop the cooking process. This will let that cabbage keep its bright beautiful green color. So get a pot of boiling water going, and a bowl of ice water ready on the counter next to your pot. Keeping your cabbage intact peel each leaf off one by one. You will need about 8-9 leaves. Once your leaves are all peeled place a few at a time in the boiling water. Let them boil for about 1 minute and thats it then take them and place directly into the ice water.

When you have finished blanching all your cabbage leaves pat them dry with a paper towel. Pull your pork mixture out of the fridge and add your cooked rice. mix together with a fork until its all blended. Now it's time to assemble your rolls. Grab a leaf of cabbage and place a good 2 spoon fulls of pork inside.
Then carefully roll your cabbage over the pork, tuck in the sides as you go. Just like your rolling a burrito. Place seam side down and continue until all your pork is gone.
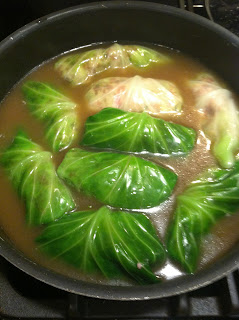
Now all this time you should have had your broth on a nice simmer. Always continue to taste your broth throughout this process to see if it needs anything, sometimes you might need to add a little more liquid, if so I usually add a little water to it. When the cabbage rolls are ready place them in a shallow pot seam side down, then strain your broth directly over the rolls. Only saving the mushrooms from the broth, you can disregard everything else.

Bring to a light simmer and cover for about 20-25 minutes. Remove the lid after 25 minutes and they should be done! If you touch the roll with your finger and the meat inside feels nice and firm then it's ready! Garnish your rolls with the shitake mushrooms and fresh cilantro!
Just so you know the judges never tasted this, I would have still been there if they had!! It's a great dish and my kids love it! I definitely got a YES from my 5 year old when he tasted it and that is what really counts in my book!!
Enjoy and Happy Eatings!!!!
Subscribe to:
Comments (Atom)


